How to Manage Multiple Brands
SweepWidget allows you to manage multiple brands under a single account. This is perfect for agencies, marketing teams, or businesses that run giveaways for different websites, products, or clients.
What is a Brand?
A “brand” in SweepWidget represents a separate workspace with its own:
- Brand name and website URL
- Giveaways and contests
- Entries and participant data
- API integrations and settings
- Plan level (Free, Pro, Business, etc.)
Each brand operates independently, so you can run separate campaigns for different clients or projects without mixing data.
How to Access Manage Brands
To access the Manage Brands page:
- Click on your profile name/avatar in the top right corner of the screen
- Select Account Settings from the dropdown menu
- Click the Manage Brands tab in the navigation bar
Alternatively, you can access Manage Brands directly from the Account Settings navigation tabs.
Brand Limits by Plan
The number of brands you can upgrade to your paid plan level depends on your subscription:
| Plan | Brands at Plan Level |
|---|---|
| Free | Unlimited brands (all at Free level) |
| Pro | 1 brand |
| Business | 2 brands |
| Premium | 3 brands |
| Enterprise | 5 brands |
Important: You can create unlimited brands on any plan, but only the number shown above will be at your paid plan level by default. If you need more brands at your paid plan level, you can purchase additional brands for $25/mo each ($250/yr on annual plans). Extra brands are available on all paid plans (Pro and above).
The Manage Brands Page
The Manage Brands page displays all your brands in a table with the following information:
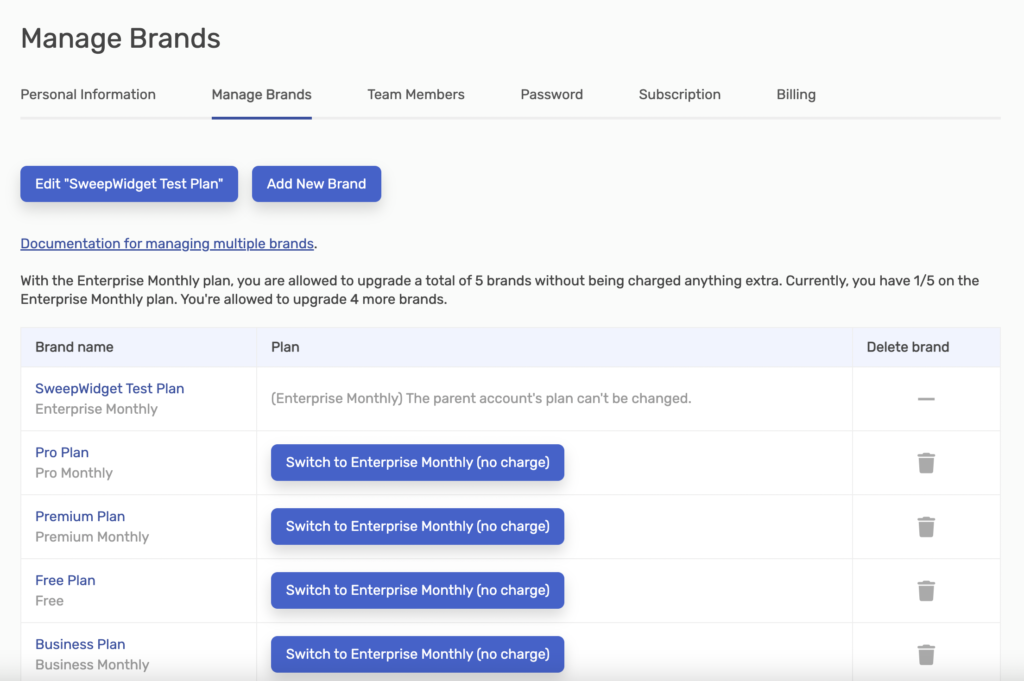
At the top of the page, you’ll see:
- Edit [Brand Name] Brand – Link to edit the currently selected brand’s settings
- + Add New Brand – Create a new brand
- Status message – Shows how many brands you’ve upgraded and how many more you can upgrade (e.g., “You have 2/3 on the Premium plan. You’re allowed to upgrade 1 more brand.”)
The brands table shows three columns:
- Brand name – The name of the brand with its current plan level shown below. Click the name to switch to that brand.
- Plan – Action button to upgrade or downgrade the brand
- Delete brand – Trash icon to delete the brand (only available for non-parent brands on the Free plan)
How to Add a New Brand
- Go to the Manage Brands page
- Click + Add New Brand
- Enter the brand name and website URL
- Select your timezone
- Click Save
The new brand will be created at the Free plan level. You can then upgrade it if you have available brand slots.
How to Upgrade a Brand
If you have a paid plan and available brand upgrade slots:
- Go to the Manage Brands page
- Find the brand you want to upgrade in the table
- Click the blue Switch to [Plan Name] (no charge) button
- Confirm the upgrade when prompted
The brand will immediately be upgraded to your paid plan level. You will not be charged anything extra – the upgrade is included with your subscription.
How to Downgrade a Brand
If you need to free up a brand slot or no longer need a brand at the paid level:
- Go to the Manage Brands page
- Find the upgraded brand in the table
- Click the gray Downgrade to Free button
- Confirm the downgrade when prompted
The brand will be downgraded to the Free plan. This frees up a slot so you can upgrade a different brand instead.
How to Delete a Brand
To delete a brand:
- First, downgrade the brand to Free if it’s on a paid plan (you cannot delete upgraded brands)
- Go to the Manage Brands page
- Click the trash icon in the Delete column for the brand you want to remove
- Confirm the deletion when prompted
Warning: Deleting a brand permanently removes all its giveaways, entries, and data. This action cannot be undone.
Understanding the Parent Account
Your first brand is automatically designated as the parent account. The parent account:
- Holds your subscription and billing information
- Cannot be downgraded or deleted
- Determines the plan level available for other brands
- Shows “(Parent account’s plan can’t be changed)” in the Plan column
If you need to change which brand is your parent account, please contact SweepWidget support.
How to Switch Between Brands
To work on a different brand:
- From Manage Brands: Click on any brand name in the table to switch to it
- From anywhere: Click your profile name in the top right, then select a different brand from the dropdown (if available)
When you switch brands, the dashboard, giveaways, and settings will all reflect the selected brand.
How to Edit Brand Settings
To edit a brand’s name, website URL, or timezone:
- Go to the Manage Brands page
- Click Edit [Brand Name] Brand at the top of the page (for the current brand)
- Or click the brand name in the table, then go to Account Settings > Manage Brands > Edit
- Update the brand name, website URL, or timezone
- Click Save
Common Questions
Will I be charged for upgrading additional brands?
No. Upgrading brands within your allowed limit is included with your subscription at no extra cost.
What happens to giveaways when I downgrade a brand?
Existing giveaways remain but will be subject to Free plan limitations. Features that require a paid plan will no longer be available for that brand.
Can team members access multiple brands?
Yes. Team members can be given access to specific brands. Manage team permissions in Account Settings > Team Members.
What if I need more brands than my plan allows?
You have a few options: upgrade to a higher plan for more included brand slots, purchase additional brands as an add-on for $25/mo each ($250/yr on annual plans), or create additional brands that remain on the Free plan.
How much do extra brands cost?
Extra brands cost $25/month each on monthly plans, or $250/year each on annual plans. The charge is added to your existing subscription and prorated for the current billing period. You can add extra brands from the Manage Brands page once you have reached your plan’s included brand limit.